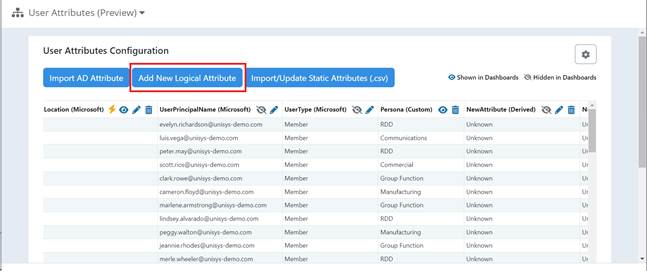
To add new Logical attribute:
1. Select Add New Logical Attribute.

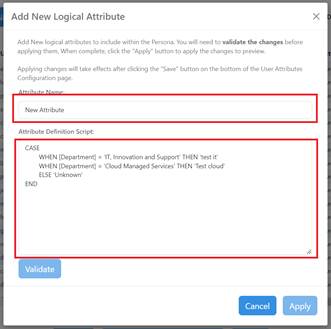
2. In the modal window opened following that provide the Attribute Name.
3. Add or modify Attribute Definition Script.

Sample script is provided to you as an example of how your script could look like. Please remove or modify it before proceeding.
NOTE
The “PowerSuite Logical Attribute scripting language Syntax” section provides information on syntax of the PowerSuite scripting language.
PowerSuite implements subset of the Microsoft SQL Server language as described in https://support.microsoft.com/en-us/office/access-sql-basic-concepts-vocabulary-and-syntax-444d0303-cde1-424e-9a74-e8dc3e460671
The section below provides more information on scope of SQL language supported.
4. Once the script is in place select Validate to confirm if the script you provided does not contain any errors.
5. Once validated you will be able to select Apply to apply the newly created logical attribute. You will see the new attribute in the list of existing attributes in alphabetical order.
First in the list you will see Azure AD attribute having (Microsoft) as part of their names.
Next in the list of attributes Custom attributes are shown having (Custom) as part of their names.
And last on the list you will see Logical – attributes having (Derived) as part of their names.
NOTE
The newly created attribute had been created only in the preview state. You can preview your changes before applying them by selecting on the Download Preview Changes at the bottom of the page.
Following the request to download changes you will be getting an email with a link to a CSV file that contains all user attributes, including AD, static and Logical attributes.
TIP
6. Select Save at the bottom of the page to save and apply your changes to PowerSuite dashboards.